
From a dream to reality: Building an AI "coloring book" with Elixir
Newbie exploring how to build an interactive canvas application, and documenting all the struggles along the way


TL;DR:
An interactive canvas application with AI which allows generating big, continuous images from your drawings
Working with canvas (Fabric.js) is challenging
Task.async is a nice feature in Elixir/Phoenix
I’m bad at math
Replicate has an official Elixir client, however it’s not perfect (yet)
Premise
I was happy to be asked to take part in Supabase’s AI Content Storm, however, I was a bit hesitant at first as I wasn’t sure I’d have enough time to work on something. I didn’t want to just write about something I’ve built in the past: I wanted to create something new, maybe with Elixir, too. I had no idea what to build, though, until a dream one night[1]!
In the dream, I was working for some software consultancy, and all the developers were being evaluated for their skills. The company had used CIA to dig up information about how well everyone can code (yes, because why not), and sadly some people had to be fired because they weren’t as good as they had told the company they were. However, before this happened, we were working on some small projects in teams, and in my team, we were creating an app where you can draw on a canvas, and then AI will create an image based on that drawing.
So when I woke up, I thought that’d be a nice thing to work on and explore, even if it was kind of basic. After a while, I had an idea of how to expand it a little bit: what if you could draw multiple images on a canvas, and AI would make it one big continuous image? This sparked my excitement as it was again[2] something a bit more different and artistic than what I’ve been craving to do in my development work. This turned out to be a good learning experience with Elixir, too.
Before we dive into this, a few things:
The stack
Elixir/Phoenix - the full-stack framework
Ash - DSL framework for Elixir that provides some very nice abstractions[3]
Replicate - generate image prompts from user drawings
Stability AI (Stable Diffusion) - generate images to be displayed on the canvas
Supabase - Storing images and canvas related data
Disclaimer
I’m an Elixir newbie in the middle of the learning process. The Elixir code I’ll show will probably have mistakes, and things could be improved a lot. Please call me out, and correct me if I say something stupid or wrong in this post!
I won't be going into full tutorial mode in this post, so check the GitHub repo for all of the code. Some parts are in the fashion of "draw rest of the owl".
The JavaScript code is also kind of rubbish, however I don't care about that. My point is to learn Elixir and how to work with LiveView, and I can always improve and clean up the JS later.
This post ended up being a bit rushed on some parts, so I might update this if I feel like I missed something.
Canvas
I’ve never really worked with canvases before[4] so I had to do some research on how to proceed with this. One of them was figuring out how to actually create continuous images with e.g. Stable Diffusion. I was aware of the inpainting capabilities, however to my understanding it was only about changing the image contents inside the boundaries, not outside. Playing with Dreamstudio a bit, when editing an image, I noticed they actually allow you to move the mask area outside the original image. And when you did that, it would generate a new image while keeping part of the original image unchanged: exactly what I wanted to do. The next step would be to reverse engineer Dreamstudio’s implementation[5].
Luckily the app prints logs of the canvas images to the browser console so I could follow more closely what was happening. It would use two images per generation:
The mask is a black-and-white image. Basically just blocks of areas which should and shouldn’t be touched. Here white areas would be untouched while black areas would be used for the new generation.
Base image that matches the mask: part of the original image that shouldn’t be touched, and the background color where it should be.
With this in mind, I started implementing the canvas with basic drawing capabilities.
const canvas = document.getElementById("canvas");
const context = canvas.getContext("2d");

let isDrawing = false;
let color = "black";
let size = 5;
let canvasSize = 512;

setCanvasSize();

canvas.addEventListener("mousedown", start);
canvas.addEventListener("mouseup", stop);
canvas.addEventListener("mousemove", draw);
canvas.addEventListener("mouseout", stop);

function start(event) {
  isDrawing = true;
  draw(event);
}

function stop() {
  isDrawing = false;
  context.beginPath();
}

function draw(event) {
  if (!isDrawing) return;

  const { clientX, clientY } = event;
  const { left, top } = canvas.getBoundingClientRect();
  const x = clientX - left;
  const y = clientY - top;

  context.lineWidth = size * 2;
  context.lineCap = "round";
  context.strokeStyle = color;
  context.lineTo(x, y);
  context.stroke();
  context.beginPath();
  context.moveTo(x, y);
}

function setCanvasSize() {
  canvas?.setAttribute("width", `512px`);
  canvas?.setAttribute("height", `512px`);
}
Nice, it works! However, at this point, I realized that it was going to be a lot of code to maintain if I wanted to do everything from scratch. Hence some canvas helper library would be useful to introduce now. Ended up with Fabric.js, which turned out pretty simple to use, even though the documentation is a bit confusing at times. Because of the documentation, I decided to stick with the current stable version instead of opting for version 6 with a bunch of different fixes.
With Fabric.js, I could just do the following to enable the drawing mode
const canvas = new fabric.Canvas("canvas", {
  centeredScaling: true,
  selection: false,
  isDrawingMode: true
});
I also wanted to restrict the drawing area to 512x512 to not make the area too big on the screen, so I opted to create two separate canvases. One that holds the images, and one that handles the drawing. Easily done with a similar setup.
const canvas = new fabric.Canvas("canvas", {
  selection: false,
  isDrawingMode: false
});

const followingCanvas = new fabric.Canvas("following-canvas", {
  isDrawingMode: true
});
The following canvas would be attached to the pointer location on the screen and would lock into a place where you double-click to start drawing. There is a lot more code to this than what is shown above, however, you get the gist of what the setup is like (two separate canvases, one allows drawing, one does not).
For the masking, I’d check if the drawing area overlaps with images on the canvas, and then draw one big white rectangle as a background at the same location where the drawing area is, and then multiple black rectangles where the overlapping happens on top of the background. This allowed me to generate the masking image quite nicely. It’s not as nice as the one in Dreamstudio: they have a blurred part on the mask which allows more wiggling room for the image generation, whereas my solution generates more sharp edges, keeping the images rectangular. This can be adjusted in the future, though.
Since everything on the canvas is a square, checking the overlapping is pretty simple: I only care which corner of the overlapping image is inside the drawing area; one image can’t have multiple corners inside the area. I also needed to adjust the positions a bit by the actual canvas coordinations in the viewport (due to possible panning and zooming). The final code ended up with something like this:
// oImg is drawing area Image object on the canvas
// obj is the current overlapping object inside a for loop
const { bl, tl, br, tr } = obj.lineCoords;

const bottomLeftInside = {
  top: oImg.lineCoords.tr.y + canvasCoords.tl.y,
  left:
    oImg.lineCoords.tr.x -
    Math.abs(oImg.lineCoords.tr.x - bl.x) +
    canvasCoords.tl.x,
  width: Math.abs(oImg.lineCoords.tr.x - bl.x),
  height: Math.abs(oImg.lineCoords.tr.y - bl.y),
};

const bottomRightInside = {
  top: oImg.lineCoords.tl.y + canvasCoords.tl.y,
  left: oImg.lineCoords.tl.x + canvasCoords.tl.x,
  width: Math.abs(oImg.lineCoords.tl.x - br.x),
  height: Math.abs(oImg.lineCoords.tl.y - br.y),
};

const topLeftInside = {
  top:
    oImg.lineCoords.br.y -
    Math.abs(oImg.lineCoords.br.y - tl.y) +
    canvasCoords.tl.y,
  left:
    oImg.lineCoords.br.x -
    Math.abs(oImg.lineCoords.br.x - tl.x) +
    canvasCoords.tl.x,
  width: Math.abs(oImg.lineCoords.br.x - tl.x),
  height: Math.abs(oImg.lineCoords.br.y - tl.y),
};

const topRightInside = {
  top:
    oImg.lineCoords.bl.y -
    Math.abs(oImg.lineCoords.bl.y - tr.y) +
    canvasCoords.tl.y,
  left: oImg.lineCoords.bl.x + canvasCoords.tl.x,
  width: Math.abs(oImg.lineCoords.bl.x - tr.x),
  height: Math.abs(oImg.lineCoords.bl.y - tr.y),
};

const rectPosition = isTopLeftInside
  ? topLeftInside
  : isTopRightInside
  ? topRightInside
  : isBottomLeftInside
  ? bottomLeftInside
  : isBottomRightInside
  ? bottomRightInside
  : {};

const rect = new fabric.Rect({
  ...rectPosition,
  fill: "black",
  selectable: false,
});

canvas.add(rect);
It was a lot of trial and error before I got everything working as intended. Adding panning and zooming capabilities changed things around. Even though this is all just basic math, I had occasions where I felt that I had idea what I was doing. Math is hard.
Long story short, I have the canvas setup working correctly, however, I'm just drawing on a canvas. Now I'll need to send the drawing to Elixir and make it generate a prompt & an image out of it.
LiveView
I started by creating new a LiveView called CanvasLive and hooking the template to our canvas code.
# coloring_book_web/router.ex
live "/canvas", CanvasLive, :index

# coloring_book_web/live/canvas/canvas_live.ex
defmodule ColoringBookWeb.CanvasLive do
  use ColoringBookWeb, :live_view

  def mount(params, _session, socket) do
    {:ok, socket}
  end
end
<!-- coloring_book_web/live/canvas/canvas_live.html.heex -->
<section id="canvas-wrapper" class="flex items-center justify-center w-full h-full" phx-hook="canvas">
  <canvas id="canvas" ></canvas>
  <canvas id="following-canvas" class="border-8 border-neutral-900 rounded-md absolute w-[512px] h-[512px] transition-[transform] pointer-events-none shadow-xl"></canvas>
</section>
// file contents converted to support LiveView
import canvas from "./canvas.js";

const Hooks = {
  canvas,
};

let liveSocket = new LiveSocket("/live", Socket, {
  hooks: Hooks,
  params: { _csrf_token: csrfToken },
});
With this hook, I can now send events to the LiveView, and handle things in Elixir. For example, I can send an event after a drawing action to start the image prompt generation with Replicate.
followingCanvas.on('path:created', () => {
  const originalDrawing = followingCanvas.toDataURL();
  const coords = canvasEl.parentElement.getBoundingClientRect();
  const canvasCoords = canvas.calcViewportBoundaries();

  this.pushEvent("send_drawing", {
    drawing: originalDrawing,
    coords: {
      top: Math.floor(coords.top + canvasCoords.tl.y),
      left: Math.floor(coords.left + canvasCoords.tl.x),
    },
  });
})
@img2prompt_model "pharmapsychotic/clip-interrogator:8151e1c9f47e696fa316146a2e35812ccf79cfc9eba05b11c7f450155102af70"

@impl true
def handle_event("send_drawing", %{"drawing" => drawing, "coords" => coords}, socket) do
  Task.async(fn ->
    gen_image_prompt(drawing, coords)
  end)

  {:noreply, socket |> clear_flash() |> put_flash(:generating, "Generating image prompt, this can take up to 5 minutes.")}
end

@impl true
def handle_info({ref, %{prompt: prompt, coords: coords}}, socket) do
  Process.demonitor(ref, [:flush])

  {:noreply,
    socket
    |> clear_flash()
    |> push_event("generated_image_prompt", %{ prompt: prompt, coords: coords })
  }
end

defp gen_image_prompt(drawing, coords,) do
  prompt = Replicate.run(@img2prompt_model, %{ image: drawing, mode: "classic", clip_model_name: "ViT-H-14/laion2b_s32b_b79k" })
  %{prompt: prompt, coords: coords}
end
What happens here is that when LiveView receives the send_drawing event, it'll spawn a separate process to handle the prompt generation so that we don't need to wait for the reply. This will free the user to use the app as usual: they'll receive an event with the info once the prompt task has been processed successfully. This was the first time using Task.async which turned out to be a pretty nice feature in Elixir. One caveat in this approach is that the task gets canceled if the user leaves (e.g. closes the browser tab). However, since this app is all about staying online and seeing the generations appear, it works fine in this case. This is what Replicate's Elixir client examples do. You can read a bit more about the asynchronous process in this short article by Fly.io.
I'd later on similarly add events start_initial_image_generation and start_inpainting to generate the images based on the prompt. I'd trigger these events from the client side after receiving the generated_image_prompt event.
this.handleEvent(
  "generated_image_prompt",
  this.handleImagePrompt.bind(this)
);

handleImagePrompt({ prompt, coords }) {
  const baseImage = this.canvas.toDataURL({
    height: 512,
    width: 512,
    ...this.maskCoords,
  });

  const eventName = !this.isMasking
    ? "start_initial_image_generation"
    : "start_inpainting";

  this.pushEvent(eventName, {
    prompt,
    image: baseImage,
    mask: this.currentMask,
    coords: {
      top: coords.top,
      left: coords.left,
    },
  });
}
On the Elixir side, I found that while we can use the Replicate client to generate an initial image[6], it provided poor results when it came to inpainting. It's almost like it didn't support going outside the original image boundaries like in Dreamstudio. When I tried calling the Stability AI API directly with the same mask and base images, it worked perfectly. It might be because the Stable Diffusion model in Replicate might not be up to date with the latest capabilities, or then something else is going on. So option here was to go with Replicate for the simple image generation, and then use the Stability AI API directly for inpainting.
defp gen_image(prompt) do
  [image] = Replicate.run(@sd_model, %{ prompt: prompt, width: 1024, height: 1024, negative_prompt: "nsfw, ugly, blurry" })

  %{image: image, coords: %{ top: generation.top, left: generation.left }}
end

defp gen_image(prompt, coords, base_image, mask) do
  multipart = Multipart.new()
    |> Multipart.add_part(Multipart.Part.text_field(prompt, "text_prompts[0][text]"))
    |> Multipart.add_part(Multipart.Part.text_field("0.5", "text_prompts[0][weight]"))
    |> Multipart.add_part(Multipart.Part.text_field("nsfw, ugly, blurry", "text_prompts[1][text]"))
    |> Multipart.add_part(Multipart.Part.text_field("-1.0", "text_prompts[1][weight]"))
    |> Multipart.add_part(Multipart.Part.file_content_field("init_image.png", String.replace(base_image, "data:image/png;base64,", "") |> Base.decode64!(), :init_image))
    |> Multipart.add_part(Multipart.Part.file_content_field("mask.png", String.replace(mask, "data:image/png;base64,", "") |> Base.decode64!(), :mask_image))
    |> Multipart.add_part(Multipart.Part.text_field("MASK_IMAGE_WHITE", :mask_source))

  body_stream = Multipart.body_stream(multipart)
  content_length = Multipart.content_length(multipart)
  content_type = Multipart.content_type(multipart, "multipart/form-data")

  req = Req.new(base_url: @sd_api_url)
    |> Req.Request.put_header("accept", "application/json")
    |> Req.Request.put_header("authorization", "Bearer #{System.get_env("STABILITY_AI_TOKEN")}")
    |> Req.Request.put_header("content-type", content_type)

  case Req.post(req, url: "/generation/stable-inpainting-512-v2-0/image-to-image/masking", body: body_stream) do
    {:ok, res} -> handle_inpainting_response(res)
    {:error, _reason} -> %{image: nil, coords: coords}
  end
end
While I was working on this, it surprised me that the Req library doesn't support multipart/form-data uploads directly (or then it was just me being a newbie and not knowing how to build the structures correctly), and I needed to introduce Multipart to pass in parameters correctly to Stability AI API. The API doesn't accept base64 strings, hence the decoding step. Client-side base64 strings with the data:image/png;base64, prefix isn't supported by the Base 64 alphabet, so it needs to be stripped off before decoding.
I initially had an older version of Multipart and was saving the initial and mask image files on disk to be able to use them in the params with a Multipart.Part.file_field function call. However, I noticed that the latest version supports adding files in-memory, which is what file_content_field does.
These Elixir functions would then pass events to the client where I could render the images in the correct locations.
this.handleEvent(
  "generated_image",
  this.renderGeneratedImageOnCanvas.bind(this)
);

// Because we cannot export tainted canvas
// (images loaded outside of the current origin)
// so just convert to Base64 for now
async getBase64ImageFromUrl(imageUrl) {
  const res = await fetch(imageUrl);
  const blob = await res.blob();

  return new Promise((resolve, reject) => {
    const reader = new FileReader();
    reader.addEventListener(
      "load",
      function () {
        resolve(reader.result);
      },
      false
    );

    reader.onerror = () => {
      return reject(this);
    };
    reader.readAsDataURL(blob);
  });
},
renderGeneratedImageOnCanvas({ image, coords }) {
  this.getBase64ImageFromUrl(image)
  .then((result) => {
    fabric.Image.fromURL(result, (oImg) => {
      // The first generation is 1024x1024 while inpainting produces 512x512 images
      if (!this.isMasking) {
        oImg.scale(0.5);
      }

      this.canvas.add(
        oImg.set({
          top: coords.top,
          left: coords.left,
          selectable: false,
        })
      );

      const rectangles = this.canvas.getObjects("rect");
      this.canvas.remove(rectangles);
      this.lockPanAndZoom = false;
      this.followingCanvas.clear();
    });
  })
  .catch((err) => console.error(err))
}
And boy, was I excited when this whole thing started working and I'd see my dream slowly becoming reality. The first time one of my drawings became a part of a continuous image was just amazing.

Persisting data
Now that the process is working, I want to persist the data so that you don’t always have to start from the beginning when refreshing the page. Enter Supabase.
Even if you could just use a locally running Postgres instance for your projects, Supabase provides a really nice Studio application to view and manage all your data in the browser. Personally I’m more comfortable using a GUI to check that my data is stored correctly, that file uploads go to the right directories, which indexes I have in which table and column, what extensions I have enabled in Postgres, etc. All of Supabase’s features can be used locally, which is especially nice for uploading files. It’s very simple to set up, too!
All you need to have Node.js & Docker installed on your machine and then run the following in your project root directory:
npx supabase init
This command will download and set up a local Supabase instance for you, printing out URLs for the API, Studio, database, etc. The most important ones for any project are the Anon and Service Role keys that are used to authenticate with Supabase’s services, and if you forgot to store them in your app’s environment files now6, you can display the same information again by running
npx supabase status
While all these things are cool, there is one thing to understand: it’s all just Postgres. I’ve read quite many comments where people have understood that you’d be stuck with a Supabase-way-of-doing-things (e.g. for migrations) if you chose it. However, since it’s just Postgres, you can do whatever you want as you’d do normally: if you want to handle everything in your application code, it’s possible like with “just” a local Postgres instance.
In any case, now we have our database running in the background via Supabase, however, we’ll need to update the configuration defaults a bit.
# config/dev.exs
config :coloring_book, ColoringBook.Repo,
  username: "postgres",
  password: "postgres",
  hostname: "localhost",
  database: "postgres", # Changed this from "coloring_book_dev" to "postgres"
  port: 54322, # Changed this from 5432 to 54322
  stacktrace: true,
  show_sensitive_data_on_connection_error: true,
  pool_size: 10
Now the Phoenix application should be able to connect to the database, and there shouldn’t be any errors in the console related to this anymore.
Next, let's add some Ash configuration and resources. You can think Ash a bit of like ActiveRecord in Rails: it allows you to model your data, actions, relationships, etc. in one file. In my opinion, this improves the project's maintainability and manageability quite significantly.
# config/config.exs
config :coloring_book,
  ecto_repos: [ColoringBook.Repo],
  ash_apis: [ColoringBook.Artwork]
# coloring_book/repo.ex
defmodule ColoringBook.Repo do
  use AshPostgres.Repo, otp_app: :coloring_book

  def installed_extensions do
    ["uuid-ossp", "citext"]
  end
end
# coloring_book/artwork/artwork.ex
defmodule ColoringBook.Artwork do
  use Ash.Api

  resources do
    resource ColoringBook.Artwork.Canvas
    resource ColoringBook.Artwork.Generation
  end
end
# coloring_book/artwork/canvas.ex
defmodule ColoringBook.Artwork.Canvas do
  use Ash.Resource,
    data_layer: AshPostgres.DataLayer

  postgres do
    table "canvases"
    repo ColoringBook.Repo
  end

  code_interface do
    define_for ColoringBook.Artwork

    define :create, action: :create
    define :read, action: :read
    define :get_by_id, action: :read, get_by: [:id], get?: true
  end

  actions do
    defaults [:read, :create]
  end

  attributes do
    uuid_primary_key :id

    create_timestamp :created_at
    update_timestamp :updated_at
  end

  relationships do
    has_many :generations, ColoringBook.Artwork.Generation
  end
end
# coloring_book/artwork/generation.ex
defmodule ColoringBook.Artwork.Generation do
  use Ash.Resource,
    data_layer: AshPostgres.DataLayer

  postgres do
    table "generations"
    repo ColoringBook.Repo
  end

  code_interface do
    define_for ColoringBook.Artwork

    define :create, action: :create
    define :read, action: :read
    define :update, action: :update
    define :delete, action: :destroy
    define :get_by_id, action: :read, get_by: [:id], get?: true
  end

  actions do
    defaults [:read, :create, :update, :destroy]
  end

  attributes do
    uuid_primary_key :id
    attribute :prompt, :string, allow_nil?: false
    attribute :top, :integer, allow_nil?: false
    attribute :left, :integer, allow_nil?: false
    attribute :image_url, :string, allow_nil?: true

    create_timestamp :created_at
    update_timestamp :updated_at
  end

  relationships do
    belongs_to :canvas, ColoringBook.Artwork.Canvas do
      attribute_writable? true
    end
  end
end
I think one of the coolest features of Ash is the migrations: it’ll automatically create migrations based on the resources! No more manually handling Ecto schemas & migration files. Just define the resource structure and run
mix ash_postgres.generate_migrations --name add_initial_migrations
It’s advised to check the contents of the generated files to see if everything is as intended, though. Another very cool thing about these migrations is that Ash keeps track of the resources and only new migration files for the changes you’ve made in the resource. This tracking is stored under priv/repo/resource_snapshots in matching resource directories. Unfortunately there isn’t a command (yet) to redo migrations if you mess something up. The only way is to remove the migration file and the correct resource snapshot, and re-run the migration generation command.
In my case, all is good and now I just need to apply the migrations with
mix ash_postgres.migrate
After these migrations, I updated all the routers and event handlers to work with canvases and generations in the database. This meant loading a canvas with an ID param in the URL, displaying all the related generations in the client-side canvas on the mount, and storing generated prompts and images correctly in the database. Below is an example of how I did the initial generation rendering for the given canvas.
@impl true
def handle_params(%{"id" => id}, _, socket) do
  canvas = Artwork.Canvas.get_by_id!(id, load: [:generations])
  generations = canvas.generations |> Enum.map(&%{ prompt: &1.prompt, image_url: &1.image_url, top: &1.top, left: &1.left })

  {:noreply,
   socket
   |> assign(:canvas_id, canvas.id)
   |> assign(:show_info_modal, Enum.empty?(generations))
   |> push_event("render_initial_generations", %{ generations: generations })
  }
end
this.handleEvent(
  "render_initial_generations",
  this.renderInitialGenerationsOnCanvas.bind(this)
);

renderInitialGenerationsOnCanvas({ generations }) {
  for (const generation of generations) {
    if (!generation.image_url) continue;

    this.getBase64ImageFromUrl(generation.image_url)
      .then((result) => {
        fabric.Image.fromURL(result, (oImg) => {
          if (generation.image_url.includes("replicate")) oImg.scale(0.5);

          this.canvas.add(
            oImg.set({
              top: generation.top,
              left: generation.left,
              selectable: false,
            })
          );
        });
      })
      .catch((err) => console.error(err));
  }
},
With the previous handle_inpainting_response I wasn't uploading anything to Supabase, I was only passing the base64 string to the client-side canvas. Since I needed to store the generated images, too, using Supabase Storage made sense. I could've used R2 or S3 for this, however I didn't want to pick another thing to learn here and the Storage instance is already included in the local Supabase setup.
There is an Elixir library for Supabase however it has not been maintained for over a year and there has been a lot of progress with Supabase since then. I also didn't want to bring another dependency into the mix as it's a learning experience anyway. So using the earlier Multipart setup as a reference, I could upload the image from Stability AI in a simple matter. The important thing to note here is that you should create a public bucket via Supabase Studio before this. In the example below, canvas-images is the bucket, and I store all images inside each canvas directory.
@impl true
defp handle_inpainting_response(res, generation) do
  case res.body["artifacts"] do
    nil -> %{image: nil, coords: %{ top: generation.top, left: generation.left }}
    [] -> %{image: nil, coords: %{ top: generation.top, left: generation.left }}
    artifacts ->
      image_base64 = artifacts |> Enum.at(0) |> Map.get("base64")

      multipart = Multipart.new()
        |> Multipart.add_part(Multipart.Part.file_content_field("#{generation.id}.jpeg", Base.decode64!(image_base64), :generated_image))

      body_stream = Multipart.body_stream(multipart)
      content_type = Multipart.content_type(multipart, "multipart/form-data")

      req = Req.new(base_url: System.get_env("SUPABASE_URL"))
        |> Req.Request.put_header("accept", "application/json")
        |> Req.Request.put_header("authorization", "Bearer #{System.get_env("SUPABASE_SERVICE_KEY")}")
        |> Req.Request.put_header("content-type", content_type)

      upload_res = Req.post!(req, url: "/storage/v1/object/canvas-images/#{generation.canvas.id}/#{generation.id}.jpeg", body: body_stream)
      generated_image_url = "#{System.get_env("SUPABASE_URL")}/storage/v1/object/public/#{upload_res.body["Key"]}"

      Artwork.Generation.update!(generation, %{
        image_url: generated_image_url
      })

      %{image: generated_image_url, coords: %{ top: generation.top, left: generation.left }}
  end
end
I noticed that sometimes when trying to generate an image, an empty artifact would be returned. Looking into this meant that either the prompt contained some filtered words or the generated image was NSFW. So the app would crash when trying to get the base64 string from the response body. Hence wrapping the uploading code in a case and returning an empty image in those cases. That way I could display an error message in the UI.
It took a while to get this working as I faced a few errors along the way (I did work on this into the wee hours of the day), however was excited to have everything persisted in the database, and loading on the canvas after refreshing the browser or restarting the server.
Final touches
While I had brought the idea to life, there were still things I wanted to do: it would make sense that the user would be able to change the brush and drawing area background colors to be able to other than black and white images.
Starting with the brush color, I updated the canvas_live.html.heex template with the following:
<section class="fixed bottom-0 h-24 w-fit right-0 left-0 mx-auto flex gap-2 items-center justify-center">
  <article id="brush" class="p-4 bg-white rounded-lg shadow-lg border-1 border-neutral-300 w-44 h-fit transition-all absolute bottom-full hidden">
    <section class="grid grid-cols-4 gap-2 items-center">
      <%= for color <- ["#fff", "#000", "#6b7280", "#ef4444", "#f97316", "#f59e0b", "#facc15", "#713f12", "#84cc16", "#22c55e", "#10b981", "#14b8a6", "#06b6d4", "#0ea5e9", "#3b82f6", "#6366f1", "#8b5cf6", "#a855f7", "#d946ef", "#ec4899", "#f43f5e"] do %>
        <button class={"rounded-full flex items-center justify-center w-8 h-8 #{if color === "#fff", do: "ring-2 ring-neutral-300 w-7 h-7"}"} style={"background: #{color};"} phx-click="select_color" phx-value-color={color}>
          <%= if color == @color do %>
            <span class={"block w-5 h-5 rounded-full #{if color !== "#fff", do: "bg-white"} #{if color == "#fff", do: "bg-black"}"}></span>
          <% end %>
        </button>
      <% end %>
    </section>
  </article>

  <button class="bg-white shadow-xl text-neutral-900 rounded-full p-2 cursor-pointer" phx-click={JS.toggle(to: "#brush")}>
    <svg xmlns="http://www.w3.org/2000/svg" width="24" height="24" viewBox="0 0 24 24" fill="none" stroke="currentColor" stroke-width="2" stroke-linecap="round" stroke-linejoin="round" class="lucide lucide-paintbrush-2"><path d="M14 19.9V16h3a2 2 0 0 0 2-2v-2H5v2c0 1.1.9 2 2 2h3v3.9a2 2 0 1 0 4 0Z"/><path d="M6 12V2h12v10"/><path d="M14 2v4"/><path d="M10 2v2"/></svg>
  </button>
</section>
This would render a floating button at the bottom of the screen, which clicked would open a small popup with some pre-selected colors to choose from. In the Elixir side I only needed to add a new event handler to make it work.
@impl true
def handle_event("select_color", %{"color" => color}, socket) do
  {:noreply, socket |> assign(color: color) |> push_event("selected_color", %{ color: color })}
end
The selected_color event would then trigger the client-side code to change the brush color in the canvas. While this worked, I noticed a weird thing whenever I clicked the floating button: the canvas would just disappear, and turn white on the screen. I had no idea what was going on, and only figured out what happened when debugging the HTML with the browser inspector tool.
Whenever the Socket gets assigned a value, and it's used in the LiveView template, all the updates will replace the current content with the template. Basically, it's just patching the view. You can prevent elements from updating by adding a phx-update="ignore" attribute to them, which I did. However, due to how Fabric.js works, this ignoring wasn't doing anything: Fabric replaces the original element with two canvases. This meant that if I added phx-update="ignore" to the canvas DOM element, it would not exist anymore after the client-side JS loaded, and when the LiveView did an update, it would revert to the original template. So the solution here was to add wrappers to the canvases, and ignore updates on those elements.
<article phx-update="ignore" id="actual-canvas-wrapper">
  <canvas id="canvas"></canvas>
</article>

<article phx-update="ignore" id="following-canvas-wrapper" class="border-8 border-neutral-900 rounded-md absolute w-[512px] h-[512px] transition-[transform] pointer-events-none shadow-xl">
  <canvas id="following-canvas"></canvas>
</article>
After this, the canvases worked perfectly fine after changing the brush color. I also added functionalities to change the drawing area background, toggle the whole page background color between dark and light, show an info modal, and confirm the drawing is ready for generation. I also added some basic authentication setup so that I could host this app somewhere, and people could try it out on their own.
With user authentication, you need to be careful when pushing events in the server as they will be global. This would mean that if user A would draw on a canvas, user B would also get notified about that on their canvas. You can avoid this by namespacing the events, which I did by appending _#{canvas_id} to the event name. Tying the events to a specific canvas would allow me to build multiplayer features on the canvases and all the connected to it would see the updates.
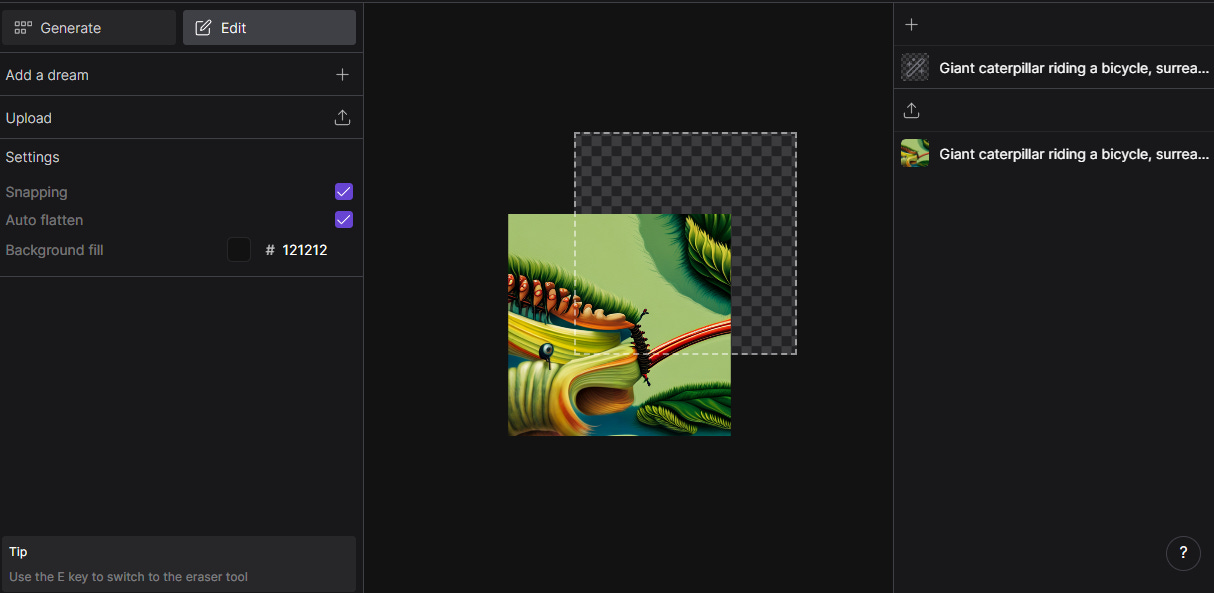
The end result
I'm super how I was able to implement this, and I learned quite a bit in the process. Using Task.async for the first time was especially nice, and made me appreciate Elixir even more. Can't wait to try out more of the async features in Phoenix LiveView v0.20! It was also a very pleasant surprise to find out that Replicate actually has an official Elixir client.
Below are a couple images displaying how the app looks/works like. I wanted to keep the UI very minimal as the main gist is the drawing and generated images. There are also a lot of things to improve with the UX (e.g. the color toggles don't close with an outside click at the moment), and there is potential to add bunch of other features to make it a more fuller experience.
Naturally, it's deployed to Fly.io, and can be found at https://maicanvas.com. Go ahead and take it out for a spin! Just as a caution: I have set pretty low billing limits on these AI platforms, so if things stop working, it's probably because of running out of credits or hitting the monthly billing limit. I'll be checking and adjusting things to keep it running for a good while, though. Nevertheless, go and create your own canvas!


[1] No joke
[2] Most of my Supabase Launch Week Hackathon projects have been creative/artistic rather than regular web apps
[3] There isn’t a project where I’m not using Ash
[4] Excluding some (failed) Three.js experimentations, and my previous Supabase Launch Week Hackathon project (doorsofabyss.com)
[5] Poor me not realizing that some of this is already covered in Stability AI’s API docs
[6] In this context "initial image" means an image that does not overlap any other images